
Define your visual style first
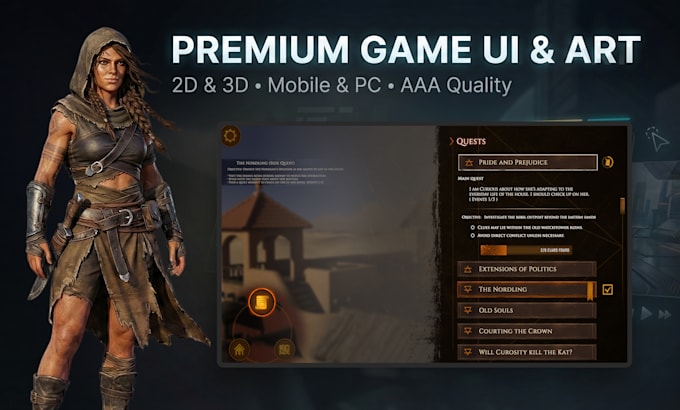
Before you start browsing marketplaces, you need to pin down the exact aesthetic for your premium game graphics. "Graphics" is a broad term that covers everything from hyper-realistic 3D environments to stylized low-poly assets. If you search without a clear direction, you will wade through thousands of irrelevant results, wasting time on assets that don't fit your game's soul.
Start by identifying the core visual language of your project. Are you aiming for the gritty realism of The Last of Us, the painterly charm of Hollow Knight, or the clean, functional UI of a mobile puzzle game? Write down three adjectives that describe your desired look. This clarity acts as a filter, helping you ignore high-fidelity 3D models when you actually need simple 2D icons.
Consider your technical constraints early. High-end graphics require powerful hardware and larger file sizes, which can impact performance on lower-end devices. If your target audience plays on mobile or older consoles, you might need optimized assets that look premium but run efficiently. Defining this boundary now prevents costly reworks later.
Compare top asset marketplaces
Finding the right premium game graphics means matching your engine to the right source. The Unity Asset Store, Unreal Marketplace, and itch.io serve different needs, and picking the wrong one can cost you time and money.
Unity and Unreal offer curated, engine-integrated assets with clear commercial licenses. itch.io is the go-to for indie game icons and stylized art that doesn't fit the standard AAA mold. Use the table below to see how they stack up against each other.
| Marketplace | Price Range | Engine Compatibility | License Type |
|---|---|---|---|
| Unity Asset Store | $5 - $500+ | Unity | Standard Unity EULA |
| Unreal Marketplace | Free - $500+ | Unreal Engine | Standard Epic EULA |
| itch.io | $1 - $100 | Any | Varies by Creator |
Unity and Unreal are the safest bets for large-scale projects. Their assets are tested for performance and compatibility, which reduces technical debt. itch.io requires more vetting, but it offers unique styles you won't find elsewhere.


As an Amazon Associate, we may earn from qualifying purchases.
Before you buy, check the license terms carefully. Some assets restrict use in NFTs or require attribution. For indie developers, itch.io offers the best value for unique icons and small props.
Check technical compatibility
Before you commit to a premium game graphics package, verify that the assets align with your engine’s current version and rendering pipeline. High-fidelity textures and complex shaders are not universal; they are often built for specific technical constraints. A model that looks stunning in Unreal Engine 5 might break entirely in Unity’s URP, and vice versa. Ensuring compatibility early saves you from expensive rework or abandoned purchases.
1. Verify engine version support
Most premium asset stores list the minimum engine version required for their products. Always check the documentation to ensure your project’s engine version meets or exceeds this requirement. If you are using a legacy version, look for assets explicitly marked as backward-compatible. Mismatched versions can lead to missing materials, broken shaders, or import errors that halt development.
2. Match the rendering pipeline
Your rendering pipeline dictates how light and texture data are processed. If your project uses the Universal Render Pipeline (URP), do not purchase assets designed exclusively for the High Definition Render Pipeline (HDRP). These pipelines handle lighting, shadows, and post-processing differently. Using the wrong pipeline asset will result in visual artifacts or a complete failure to render. Confirm the pipeline type in your asset’s technical specifications before buying.
3. Check texture formats and compression
Premium game graphics often come in multiple texture formats to suit different platforms. Ensure the package includes formats compatible with your target hardware, such as ASTC for mobile or BC7 for PC. If the assets use proprietary compression, verify that your engine supports decoding them natively. Unsupported formats require conversion, which can degrade quality or increase load times. Always review the included texture documentation to avoid platform-specific pitfalls.
Review license terms carefully
Before you import premium game graphics into your engine, treat the license agreement as the blueprint for your project’s legal safety. A mismatch here doesn’t just cause headaches; it can halt production or lead to costly lawsuits. Understanding the specific permissions attached to each asset is the difference between a smooth release and a legal nightmare.
Personal vs. Commercial Rights
The most common pitfall is assuming that "premium" automatically means "commercial use." Many high-end 3D models, textures, and concept art are sold under personal licenses, meaning you can use them for portfolio pieces or non-profit experiments, but not for a game you plan to sell. Always look for explicit commercial rights in the product description. If the license is unclear, contact the creator directly. Do not proceed with the asset until you have written confirmation that you are allowed to monetize the final product.
Attribution and Resale Restrictions
Even when commercial use is permitted, attribution requirements can vary wildly. Some premium graphics require you to credit the artist in your game’s credits screen, while others are "royalty-free" with no attribution needed. Additionally, watch out for resale restrictions. Some licenses prohibit you from redistributing the raw asset files, even if you’ve modified them. This means you cannot bundle the original texture packs or model files with your game installer. You must integrate them into your engine’s proprietary format.
Exclusive vs. Non-Exclusive Licenses
For premium game graphics, you’ll often choose between exclusive and non-exclusive licenses. A non-exclusive license allows the creator to sell the same asset to hundreds of other developers. This is common for stock-style assets. If your project relies on unique, proprietary visuals to stand out in the market, you might need an exclusive license. This grants you sole rights to the asset, preventing competitors from using the same models or textures. Exclusive licenses cost significantly more, but they protect your game’s distinct visual identity.
Platform-Specific Permissions
Finally, check if the license covers all platforms you intend to release on. Some licenses are restricted to non-commercial use or specific platforms like PC only. If you plan to port your game to consoles or mobile devices, ensure the license explicitly covers those distribution channels. Ignoring platform restrictions can invalidate your insurance coverage and expose your studio to liability if you expand your market later.
Test assets in a blank scene
Before you commit premium game graphics to your main project, import them into a neutral, blank scene. This step acts as a quality control checkpoint, letting you spot visual mismatches or performance hits without the distraction of your existing environment.
Start by creating a simple scene with a single directional light and a gray background. Import one asset at a time to isolate its behavior. Check for issues like incorrect lighting responses, texture stretching, or unexpected shadows. This neutral setup ensures you are evaluating the asset’s true quality, not just how well it blends with your current art direction.
If the asset performs well in isolation, move it into your actual game environment. Compare how it interacts with your specific lighting and other objects. This two-step process saves time by catching integration problems early, ensuring your premium graphics hold up under real-world conditions.
Frequently asked: what to check next
Work through 2026 Guide: Where to Find Premium Game Graphics and Indie Game Icons for Modern Engines
No comments yet. Be the first to share your thoughts!